VPN
Instructions for Cerner Access
Please
call or email the Kuakini Help Desk If you have
questions or issues
Phone:
808-547-9787
Email:
helpdesk@kuakini.org
1. Download and install
the Citrix Workspace App (Skip this step if you already have the Citrix
Workspace App Installed)
2. Download and install
the Palo Alto GlobalProtect Agent (Skip this step if
you already have the GlobalProtect Agent Installed)
3. Connect to Kuakini VPN
using the Palo Alto GlobalProtect Agent
4. Configure Multifactor
Authentication (Skip this step if you already configured Multifactor
Authentication)
5. Browse to the Cerner
Storefront to access Cerner Applications
6. Disconnect from the Kuakini VPN
7. Reconnect to Kuakini VPN
1. Download and Install
the Citrix Workspace App (if already installed then click here
to go to Step 2)
The Citrix Workspace App is required to access Cerner Applications
i. Download and install the Citrix Workspace App by clicking - Citrix Workspace app for Windows LTSR 2402
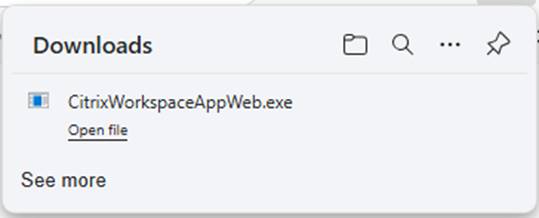
b. Click the Open File link to start the Installation
c. Click Yes to allow this App to make changes
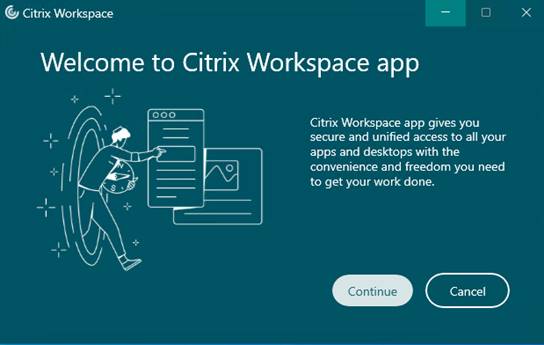
d.
Click Continue
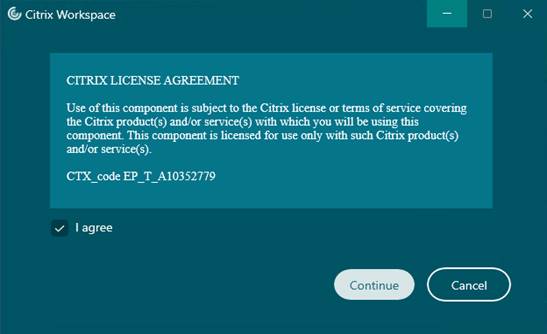
e. Check the box for “I agree” to the License Agreement then click Continue

f. Leave the Boxes uncheck then click Install
g. Citrix Workspace App will install
h. At the “Welcome to Citrix Workspace”, Leave the field to enter the URL or email address blank
i. Click the X on the top right hand corner to close the Window
j. Citrix Workspace Installation is now completed
2. Download and install
the Palo Alto GlobalProtect Agent (if already
installed then click here to go to Step 3)
a. Download and install the Palo Alto GlobalProtect Agent by clicking one of the following links
b. For Windows 32bit Operating System Users - GlobalProtect Agent for Windows 32Bit
c. For Windows 64bit Operating System Users - GlobalProtect Agent for Windows 64bit
d. The Download Progress will appear

e. Click the Open File to start the installation of the GlobalProtect Agent
f. Click Next at the Welcome to GlobalProtect Setup Wizard screen
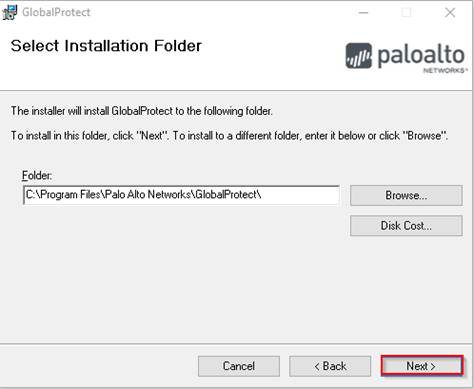
g. Click Next at the Select Installation Folder screen
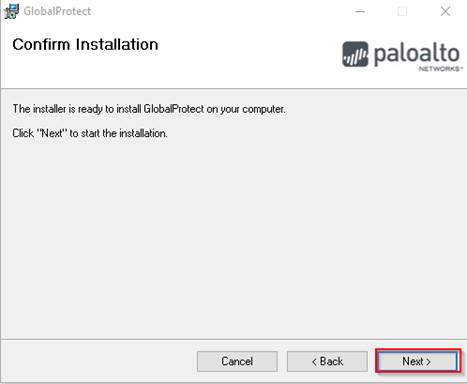
h. Click Next at the Confirm Installation screen
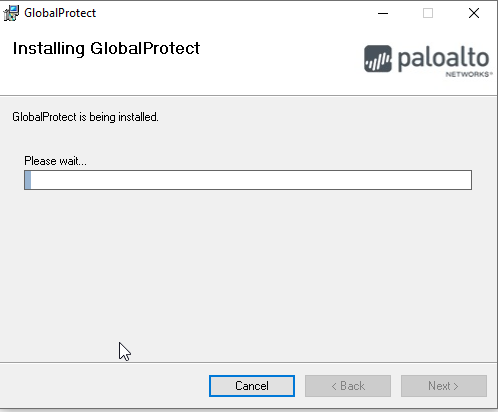
i. Wait for the Installing GlobalProtect progress screen to complete
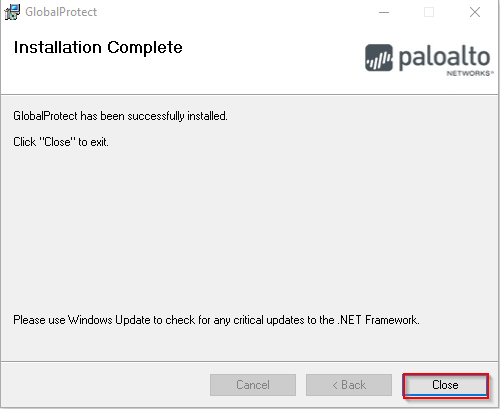
j. Click Close at the Installation Complete screen
3. Connect to Kuakini VPN using
the Palo Alto GlobalProtect Agent
Note:
If you already have GlobalProtect
Agent configured for another Organzation then click here
to add Kuakini Medical
Center to the GlobalProtect Agent
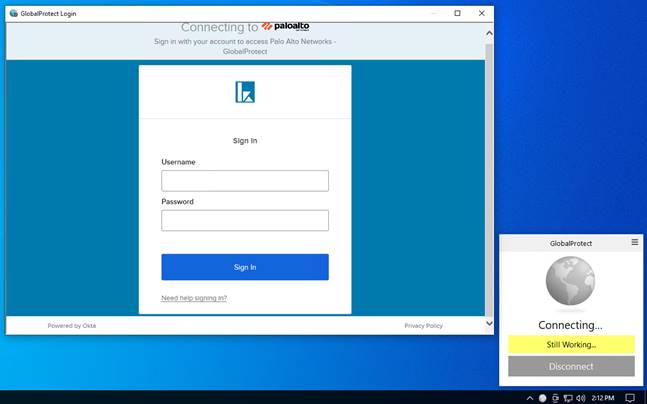
a. The following Dialog should appear on your Desktop
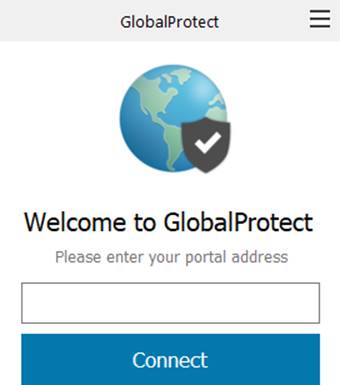
b. If the Dialog does not appear then click the GlobalProtect Agent Icon in the Notification Area of the Taskbar
![]()
c. Enter khsvpn.kuakini.org as the portal address

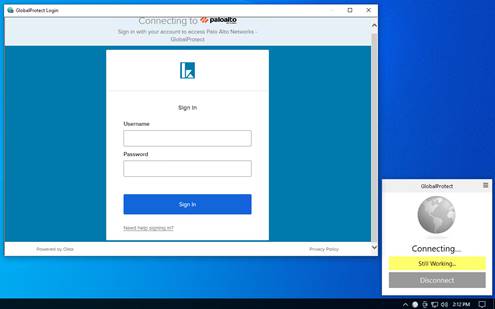
e. Enter your Username and Password to connect to the Kuakini VPN
4. Configure Multifactor Authentication (if you already enrolled then click here)
Okta Multifactor Authentication Instructions
You will need to configure one or more of the following Multifactor Authentication (MFA) Factors. If you configure more than one then will be able to choose which one you wish to use each time time you logon to the VPN.
Note: The SMS Authentication is the easiest Multifactor Authentication (MFA) factor to setup and use
Okta Verify – After configuring this factor, users signing in to Okta see that extra verification is required. If Okta Verify is selected they will be instructed to download the Okta Verify App. Once installed, the user will be prompted to enter the generated six digit number to gain access.
SMS Authentication - After configuring this factor, users signing in to Okta see that extra verification is required. If SMS Authentication is selected they will be instructed to input a mobile phone number where a security token will be sent via SMS. Once a token is received, the user can enter a token to gain access.
Google Authenticator - After configuring this factor, users signing in to Okta see that extra verification is required. If Google Authenticator is selected they will be instructed to download the Google Authenticator App. Once installed, the user will be prompted to enter the generated six digit number to gain access.
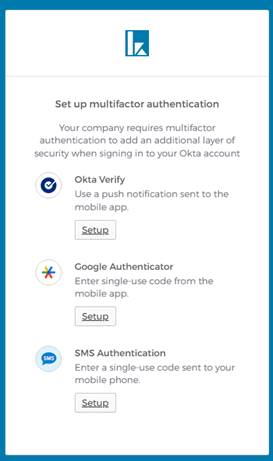
a. To enroll and configure the MFA Factor(s) you wish to use
b. After logging on to the VPN the first time you will be prompted to set up multifactor authentication
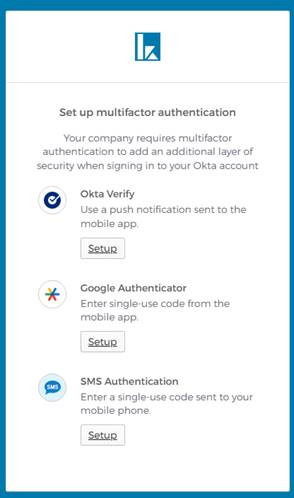
c. Click the Setup for the Multifactor Authentication Factor that you wish to use
Note: SMS Authentication is the easiest to setup. You only need to setup one factor
d. For SMS Authentication
i. Select the Setup button for SMS Authentication
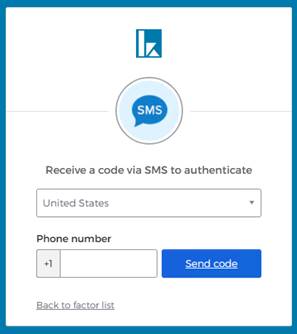
ii. Enter the Phone Number you wish to receive the SMS message on
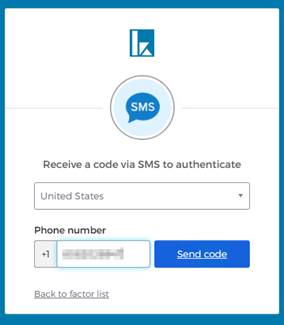
iii. Click the Send Code button
iv. Retrieve the 6 Digit Code from the SMS message
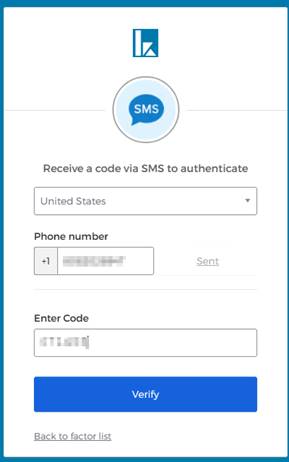
v. Enter the 6 Digit Code then click Verify
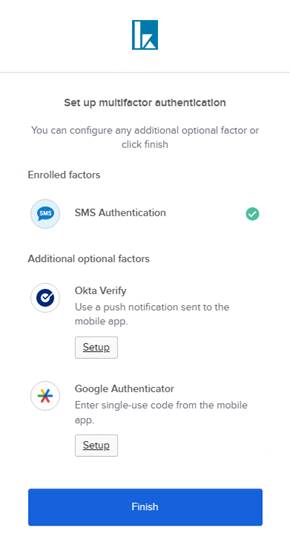
vi. Optional: If you wish to have the option of choosing a different MFA when you logon to the VPN then click the setup for that MFA
Note: It is easier to setup another MFA at this time instead of later. It is optional
vii. If you do not wish to setup another MFA then click Finish
e. The next time you logon to the VPN (after you enter your username/password)
i.
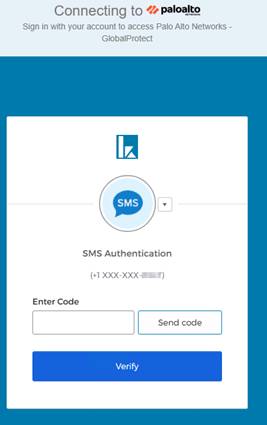
ii. Click Send code
iii. Retrieve from the Code sent to your SMS Messaging App on your phone
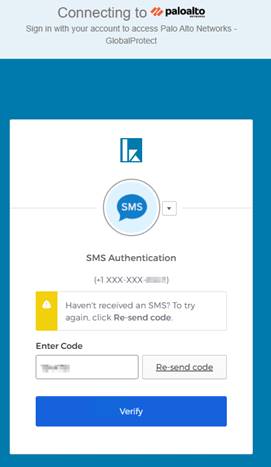
iv. Enter the 6 Digit Code then click Verify to complete the VPN Logon process
f. For Okta Verify Factor
i. Click the Setup button for Okta Verify
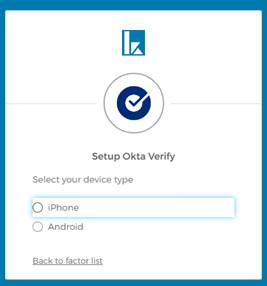
ii. Select the type of Phone you will be using (iPhone or Android)
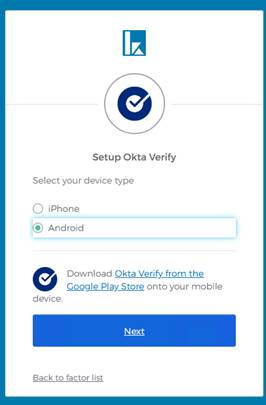
iii. If Android then download the Okta Verify App from the Google Play Store then Click Next
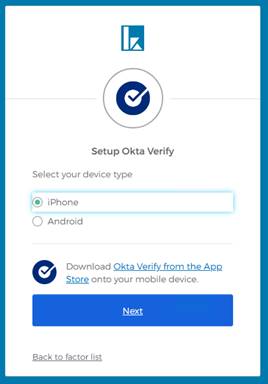
iv. If iPhone then download the Okta Verify App from the App Store then Click Next
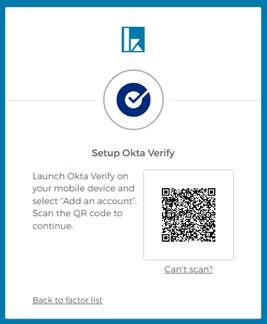
v. Launch Okta Verify on your Phone then select Add Account.
1. Choose the type of account to add. Tap Organization
2. Add Account from another device. Tap Skip
3. Do you have your QR code? Tap Yes, ready to scan
4. Scan the QR code to continue
vi. Account Added. Tap Done
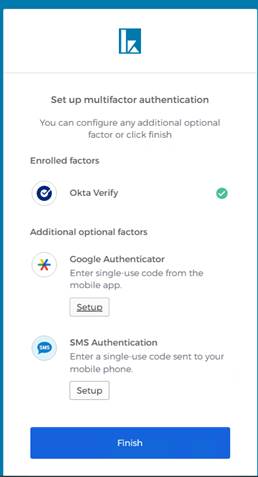
vii. Your Account has now been configured to use Okta Verify as a MFA
viii. Optional: If you wish to have the option of choosing a different MFA when you logon to the VPN then click the setup for that MFA
Note: It is easier to setup another MFA at this time instead of later
ix. If you do not wish to setup another MFA then click Finish
g. The next time you logon to the VPN (after you enter your username/password), you will be prompted for MFA
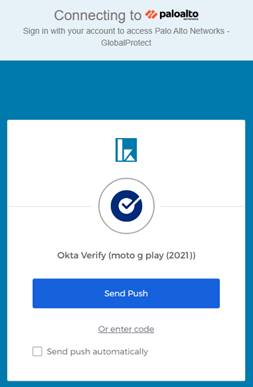
i. Click Send Push to receive a prompt on your phone. From your phone
1. Click “Yes, it’s me” to allow the logon.
2. Click “No, it’s not me” to deny the logon
Note: You can check the box to Send push automatically instead of clicking the Send Push button each time you logon
ii. Click “Or enter code” to enter the 6 digit code from the Okta Verify App

iii. Enter the Code then click Verify to complete the logon process
h. For Google Authenticator Factor

i. Click the Setup for Google Authentication
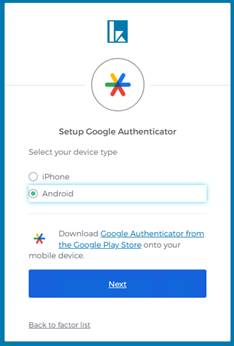
ii. Select the type of phone you have
iii. If Android then download the Google Authenticator App from the Google Play Store then Click Next
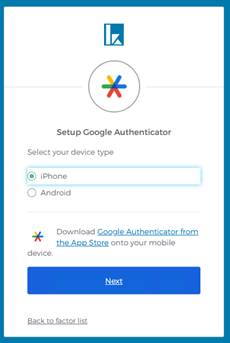
iv. If iPhone then download the Google Authenticator App from the App Store then Click Next
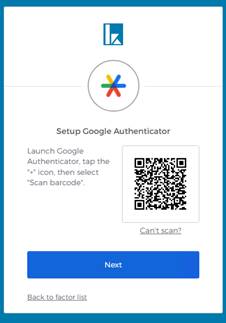
v. Launch the Google Authenticator App then tap the “+” icon
vi. Select the Scan a QR code
vii. Scan the QR Code then click Next
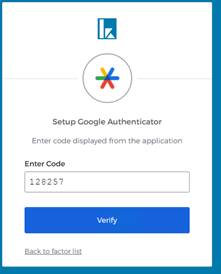
viii. Enter the 6 Digit Code from the Google Authenticator App then Click Verify
ix. Google Authenticator MFA is now completed
x. The next time you logon to the VPN (after you enter
your username/password), you will be prompted for a 6 Digit Code that you can
retrieve from the Google
Authenticator App
xi. Enter the 6 Digit Code then click Verify to completed the VPN Logon process
xii. If you successfully logged
on then the GlobalProtect Agent Icon
will appear as
5. Browse to the Cerner Storefront to access Cerner Applications
a. Start your Browser (Microsoft Edge, Chrome or Safari)
b. Go
to https://kmchictx.cernerworkswan.com/Citrix/Prodweb/
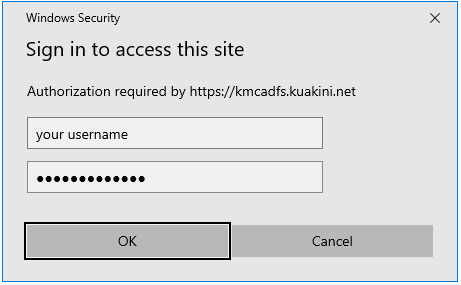
c. Log on to the Citrix Storefront
using the same User Name and Password that you used to log on to the VPN
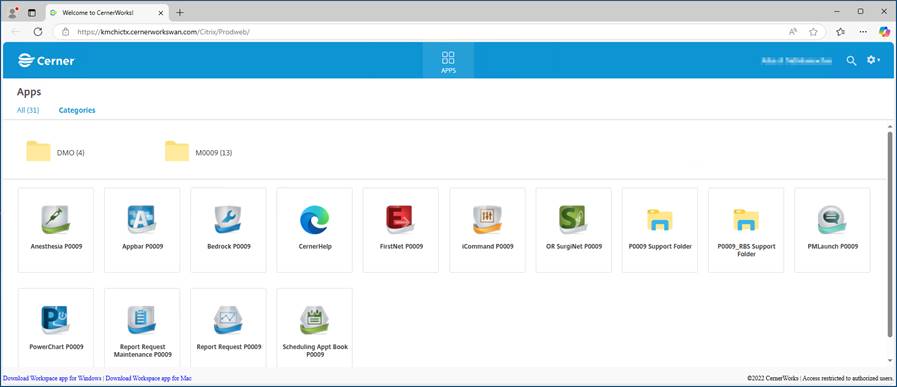
d. Access the Cerner
Application as required
**Note – When
clicking on the application the ICA file will be display in Downloads. If it
doesn’t automatically open the application then click on Downloads.
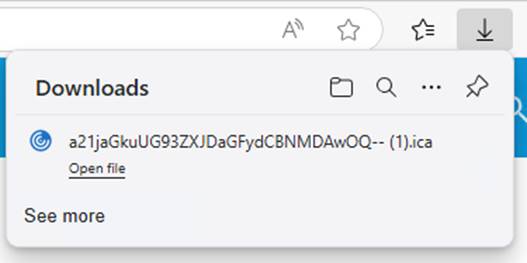
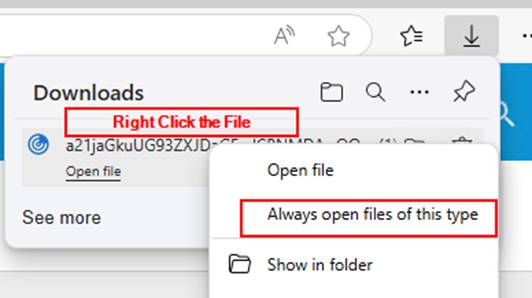
e. Right
click the downloaded ICA file then Select “Always open files of the type”
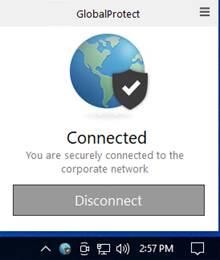
6. Disconnect from the Kuakini VPN
a. Disconnect or log off from the Server when you are finish
b. To log off and disconnect from the VPN

c. Click the GlobalProtect Agent Icon located in the Notification Area of the Taskbar
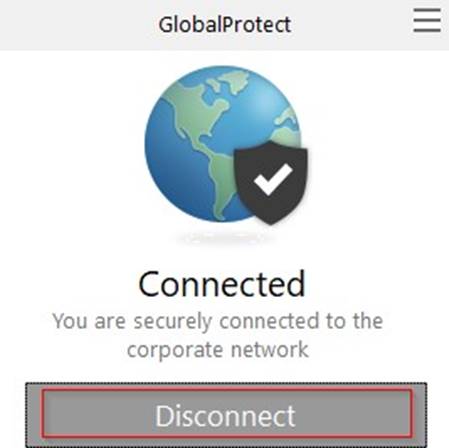
d. Click Disconnect
7. Reconnect to Kuakini VPN
![]()
a. Click the GlobalProtect Agent Icon located in the Notification Area of the Taskbar or start the GlobalProtect Agent from the Windows Start Menu

b. Click Connect
c. Enter your Username and Password to logon to the VPN
d. Complete the Multifactor Authentication to complete your logon to the VPN
e. Start Remote Desktop Connection to connect to your Work PC
Please call the Kuakini Help Desk If you have questions or issues
Phone: 808-547-9787
Email: helpdesk@kuakini.org